Don’t Be Afraid to Practice These 7 Advanced Tattooing Techniques
1) Creating Highlights with White-Colored Tattoo Ink
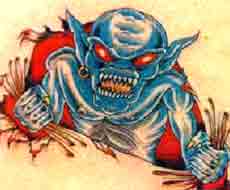
You can use some white tattoo ink to pull out highlights after you have finished a detailed art. Wait until the ink is dry, and then apply a little white to the area you wish to lighten up. Be sure to mop up the excess ink with a tissue or a sponge, after which, you quickly tone down the color. In the tattoo art below, the whites on the blue creature’s forehead and body were pulled out with a really good quality tattoo ink in pure white, and so were the white highlights across its knuckles.
You can use some white tattoo ink to pull out highlights after you have finished a detailed art. Wait until the ink is dry, and then apply a little white to the area you wish to lighten up. Be sure to mop up the excess ink with a tissue or a sponge, after which, you quickly tone down the color. In the tattoo art below, the whites on the blue creature’s forehead and body were pulled out with a really good quality tattoo ink in pure white, and so were the white highlights across its knuckles.
For a different effect, use a soft grey ink on a dry tattoo without first moistening the skin. You'll find that some colors come up almost completely and others hardly come up at all.
2) Masking out Lights
At times you will want to keep part of the tattoo design white while you apply additional layers of ink over it. For this you will need a resist, either a piece of cloth or a sheet of thin cardboard. Use cardboard when you want to protect an area that has a clear, precise shape—something like the scales of a dragon. For less defined areas — a jumble of flowers or highlights that flicker on water, for example—use a piece of cloth.
The cloth should not be too thick. Inking can be done with a small set of tattooing needles reserved for the cloth alone. To remove it, gently rub it off the skin with your fingers or with a tissue. Here, a piece of cloth was placed onto the skin to block out the shape of the crescent moon see in the tattoo image below before any color was applied. Next, a light blue ink was spread across the outer area of the moon.
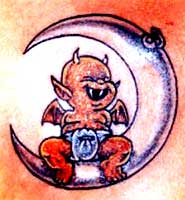
When it dried, additional colors were inked onto the skin to mask out the lower portion of the moon. After the rest of the tattoo was completed, the cloth was removed, revealing the winged imp creature sitting happily in the middle of the crescent moon. This is a brilliantly crafted tattoo art!
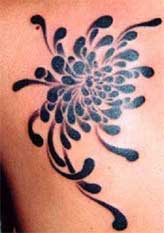
3) Stippling
Once you know how to use it, stippling will become a powerful tool. The technique is actually quite simple. After moistening a tattoo needle with ink, gently press the tip of the needle against the skin to create small dabs of color. In the tattoo art at bottom, the dabs range from fairly large passages of purple to the small touches of yellow. Vary the pressure you put on the needle to produce a variety of patterns.

4) Squeezing Out Color
Lights can be pulled from a newly applied ink using a very small piece of sponge (or anything similar). This works best with fairly dark color and for fairly fine detail, as in the eagle tattoo on display below.
Lights can be pulled from a newly applied ink using a very small piece of sponge (or anything similar). This works best with fairly dark color and for fairly fine detail, as in the eagle tattoo on display below.
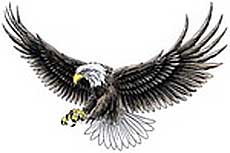
Lay in the color, then allow it to begin drying; it's easiest to remove colored ink when it's not too liquid. Use the sponge to push through the color gently, but with a little pressure, forcing the ink slightly away from the skin. Don't use too much pressure because the ink can get easily messed up.
5) Spattering
A favorite technique that’s easy to use, spattering is capable of producing fascinating surface textures and patterns. Load your needle with ink, shake or squeeze some of it off, then hold the needle close to the skin. Rap the handle of your tattoo gun sharply with your other hand to spatter paint onto the surface of the skin. A little practice will teach you how to direct the flow of ink. For a finer ink application, use the smallest size tattoo needle. Dip the tip of the needle into the ink, hold it close to the skin, then run your thumb along the tip.
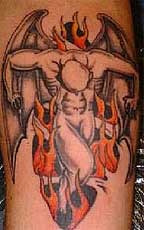
Once again, adequate practice will teach you how to control the ink. Just check out the devil in flames tattoo presented above. You can see clearly that the red and orange colored ink have been spattered onto the surface of the skin with varying tattoo needle sizes, suggesting the flames rise along with the intricately detailed and menacing-looking winged devil.
6) Wiping Out Lights
Soft white clouds and pale misty skies can be simply and wonderfully rendered by wiping ink away with a damp sponge, as shown in the tattoo right below.
6) Wiping Out Lights
Soft white clouds and pale misty skies can be simply and wonderfully rendered by wiping ink away with a damp sponge, as shown in the tattoo right below.
After you have rendered in the sky, let the paint settle for about a minute, then take a sponge that has been moistened with clear water and wipe the color off the skin surface.
7) Lifting Out Color
When you want to create soft puffy clouds, try lifting color off the skin with a tissue or a paper towel. Go ahead and ink in the sky first, and then allow the color settle for a minute. The next step is to gently dab the color up with a light touch. Move your fingers in an undulating way to create the soft, uneven shapes you see in the tattoo at the bottom of this page.