Assorted Techniques for Producing Stunning Nature Tattoos Part 1
Hello there! I would like to welcome beginner and experienced tattooists who are checking out this page right now. What you are seeing on this page is a decent load of info on the techniques I often use to create a bunch of stunning nature tattoos such as the ones below.
You see guys; I really love creating nature tattoos because they are challenging, fun and very easy on the eye (if done well). For the past 6 months or so, I’ve been doing plenty of nature tattoos so I thought I should share some of my techniques on this site. Bear in mind that this is merely the first part. When I have some free time, I’ll be sure to add more tutorials and techniques which I hope you would benefit from.
In this part, I’m going explain to you guys the techniques I use to ink really delicate looking growth around the base of a tree in a tattoo, and inking green leaves against a rich green backdrop.
Creating Delicate Growth around the Base of a Tree with Tattoo Needle and Ink
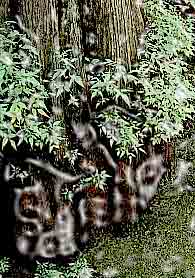
The Challenge
The greens could easily be overpowered by the dark tree trunks. You want to make sure that don’t happen, or you’ll likely going to lose the lush, verdant quality that give this tattoo design a very high-level visual appeal.
Techniques for Solving this Challenge
Middle tones should be used most of the time, while darker tattoo pigment for rendering texture and detail. To make the green leaves that grow out of the trunks really stand out, use a very high quality tattoo ink. After you have completed your drawing, color the dark areas deep within the background using a combination of ultramarine and sepia.
Next, you should highlight the tree trunks with medium brown tattoo ink, and then drop in yellow ocher, mauve, olive green, and burnt sienna, mixing them right on the client’s skin or a sheet of practice skin for tattooing.
So, we have added details to the tree trunks; now let’s turn our attention to the ground. For this step, you want to start with a graded coloring blended from new amboge and olive green. Work from the darkest areas in the background to the lighter ones up front, and then begin adding texture. Start with small dark colors that spiral back into the tattoo, then load your needle with bright green ink and apply the paint densely over the ground. Do not forget to put a bit of work on the flora growing out of the trunk.
Now, it is time to render the leaves. You can do it in a rather loose fashion. Some details can be done soft and unfocused, but attention should be focused mostly on their shape. For the final touch, add only a handful details such as the small pink touches in the rear, as well as the foliage springing out of the fallen trunk in the immediate foreground.
Note:
Dense inking is ideal for displaying masses of tiny details. In this tattoo design for example, the dense inking technique was used to great effect for making the lush, wet surface of the swamp. When you're working with this much tattoo ink, it is a good idea to stop from time to time so you can effectively evaluate how much ink you've laid down. If the inking pattern becomes too dense, they'll run together and the intriguing, organic patterns that make the surface of the tattoo dynamic will become lost. Try using several needle sizes as well, because such approach helps to prevent your work from becoming monotonous.
Rendering Green Leaves against a Rich Green Backdrop with a Tattoo Needle and Ink
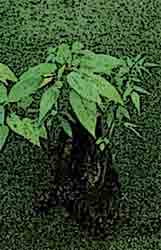
The Challenge
Looking at the tattoo design above, you can clearly see that the light is so diffuse and subdued, which results in the contrast being close to nonexistent. Also note the swampy ground, which is just slightly darker than the leaves.
Looking at the tattoo design above, you can clearly see that the light is so diffuse and subdued, which results in the contrast being close to nonexistent. Also note the swampy ground, which is just slightly darker than the leaves.
Techniques for Solving this Challenge
Forget about tattooing the leaves in the beginning, and focus your attention on developing the background first. When you add the leaves later, controlling their color and value and then setting them off from the darker ground will be much easier to accomplish. It is imperative that you do a careful drawing of the knees, then mask out the leaves using a small piece of disposable cloth.
A mottled inking technique should be used initially for the background. Refer the design once again and you can see the color combination of the background is made up of olive green, new gamboge, yellow ocher and Payne’s gray. Trunks should be inked in prior to adding texture to the background. Next, load your tattoo needle with ink and apply it over the ground.
Now it's time to get rid of the disposable cloth and lay in the bright green leaves. To set them off from the background, you want to ensure they are applied just a bit lighter and brighter than they actually are. After that, intensify some of the greens in the leaves, then ink in their veins using light, delicate needlework.
When you are close to finishing your tattoo art, measure how successfully the ground relates to the knees. If it overall appearance seems a bit too light and it did here—dilute it slightly with Hooker's green. Then, to heighten the shadowy areas near the knees, add a light blue ink around the stumpy growths.
Lastly, with the same green used to intensify the color of the leaves, apply still extra ink over the background. Note how effective the final touches are. The standout element is no doubt, the subtle blue ink which not only picks out the shadows beneath the knees, but also helps pull the background away from the leaves and stumps. And I really like the fact that the solid tattoo ink keeps the final coloring from becoming too dominant.
