How to Make Preliminary Flowers and Trees Tattoo Art
Making highly detailed and stylized tattoos of flowers and trees can be pretty tricky. Most newcomers to the art of tattooing shudder at the thought of creating such designs. The key is to create detailed preliminary ink work before you start making those tattoos. In this tutorial-style article, I’m going to provide you with a bunch of hints and pointers on how to create a detailed preliminary ink work on a tattoo practice skin.
The Challenge
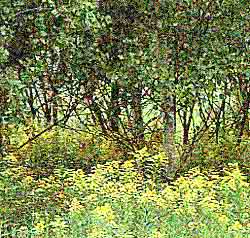
When you attempt to create a tattoo art depicting a glorious setting like this, the flowers can seem so amazingly brilliant that you may end up overemphasizing them. This is a mistake that has to be avoided, especially if you wish to develop the entire scene.
When you attempt to create a tattoo art depicting a glorious setting like this, the flowers can seem so amazingly brilliant that you may end up overemphasizing them. This is a mistake that has to be avoided, especially if you wish to develop the entire scene.
Overcoming the Challenge
Add the flowers tattoos at the end of the overall design. Doing so allows you to measure effectively how their color reacts with all the others you use. Mask them out using a piece of clean cloth before you begin to ink. It is best that you render the flowers using vibrant tattoo inks.
Step 1
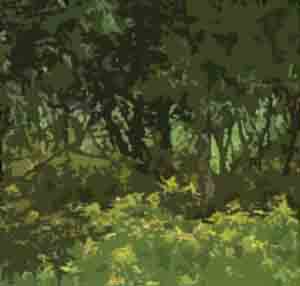
Massed together, trees in full foliage appear to merge. Making this preliminary ink work will keep you aware of the actual tattoo’s structure.
Next, lay in a pale green ink for the background. Experience is important when it comes to gauging how pale the background really is. Although the ink will dry lighter than it goes down, you should just begin with a paler pigment than you think you need. Start inking the dark areas in the foreground.
Step 2
Keep on building up the distant background, articulating the trunks of the small trees in the furthest position. At the same time, keep your eye on the middle ground. After you've put down the intermediate greens, add texture to this area right away. Lighten some areas by picking up ink with the tip end of the needle. Other areas require darkening so you can ink those using slightly darker pigment, of course.
Step 3
The foreground should be worked on now. Keep it as lively as you possibly can. Make use of a range of greens in a variety of densities so that the tall stems that support the flowers are indicated clearly. Take a look at the finished preliminary art below. A number of those stems are even rendered using pale yellow tattoo ink. Do not forget to enrich the colors in the middle ground as well. Here yellow ocher suggests that the goldenrod extends all the way to the horizon. Now you can get rid of the masking cloth.
The Finished Preliminary Tattoo Design
About all that's left to be done now are the flowers themselves. To ink them in, use vibrant yellow tattoo ink. Work them in slowly for best results. After the ink dries, evaluate how successfully you've indicated space and how effectively you've developed the relationships between the goldenrod and aspen. Are the flowers in the middle ground too brilliant? If it is too brilliant, my suggestion is to soften them up by applying a light application of dull green tattoo ink. This is a really terrific approach as it gets them pushed farther back, resulting in the foreground flowers appearing that bit more immediate.
It’s not a bad idea to use the same green ink as way of indicating details and shadows on the flowers which are in the closest position to you. Next, examine the trees. Do those in the foreground seem closer than those farther back? If not, you should add touches of strong dark green to their leaves.
It’s not a bad idea to use the same green ink as way of indicating details and shadows on the flowers which are in the closest position to you. Next, examine the trees. Do those in the foreground seem closer than those farther back? If not, you should add touches of strong dark green to their leaves.
Final Detailing
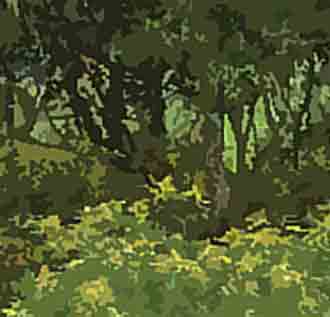
When you take a real close look and examine the detail like this, you can clearly view how richly textured the finished preliminary tattoo is and how meticulously its layers have been built up —from the initial light green ink to the final application of dark green.
Examine the field of goldenrod and its complexity of detail. Be sure to note how the stems and flowers have been developed and how they would help structure the final tattoo art. If they were less carefully made, the end result - particularly the foreground, would have looked utterly boring and flat.
Observe the middle ground as well and it is clear to see that it has also been worked out in a meticulous fashion. There's a clear sense of the hazy light shining through the aspen, then falling onto the goldenrod. The flowers and trees seem to carpet the landscape all the way to the horizon. Finally, the crisp, clean branches in the foreground contrast sharply with the paler, hazier ones farther back.
