Assorted Techniques for Producing Stunning Nature Tattoos Part 2
Hey there guys! Here’s part two of my tips and tutorial series featuring a number of assorted techniques I personally used to create the nature tattoos presented throughout this page. Oh, and do not miss out on part one! If you haven’t checked it out yet, please do so by clicking here. Now, enjoy part 2!
Techniques for Tattooing a Sharply Focused Subject against a Soft Background
To focus in on a subject, as a tattoo artist, you have to train yourself to downplay what lies beyond it. Some practice is required in order to get the hang of reducing the effects or even ignore unimportant elements.
Solution
Mask out the foreground—the real subject of this particular tattoo design — and lay in an ink-in-ink background. A realistic feel is what you should be aiming for and to attain this, make use of related colors in both areas. Try to suggest that if someone was to look up and redirect his or her gaze from this tattoo, the background would immediately spring into focus.
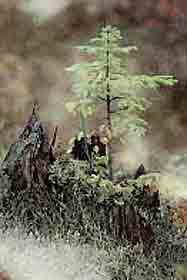
There's a lot of detail to the seedling and trunk, so making a handful of thorough preliminary tattoo drawings is mandatory. Next, ascertain where you'll want to maintain a sharp edge. Check out the photo of my tattoo design above and notice that the areas where I maintain a sharp edge are located around the stump and spruce, along with the surrounding growth.
I then covered those areas with a piece of cloth. It is what I used to mask areas that I do not wish to tattoo initially. Now you can get started on the background, but first, you need to dip your tattoo needle in your chosen ink. Now begin to apply the ink, gently working it around so that the surface are kept as fluid as possible. Next, add brighter colors – no dark tones here because the ink will hold its shape yet still remain soft.
Next, I took off the masking cloth and ink the seedling, trunk, moss, and flowers. Softening any harsh transitions is the last step, so between the foreground and background, I applied a bit of color onto the edges of the seedling as well as the surrounding growth.
Solution
Mask out the foreground—the real subject of this particular tattoo design — and lay in an ink-in-ink background. A realistic feel is what you should be aiming for and to attain this, make use of related colors in both areas. Try to suggest that if someone was to look up and redirect his or her gaze from this tattoo, the background would immediately spring into focus.
There's a lot of detail to the seedling and trunk, so making a handful of thorough preliminary tattoo drawings is mandatory. Next, ascertain where you'll want to maintain a sharp edge. Check out the photo of my tattoo design above and notice that the areas where I maintain a sharp edge are located around the stump and spruce, along with the surrounding growth.
I then covered those areas with a piece of cloth. It is what I used to mask areas that I do not wish to tattoo initially. Now you can get started on the background, but first, you need to dip your tattoo needle in your chosen ink. Now begin to apply the ink, gently working it around so that the surface are kept as fluid as possible. Next, add brighter colors – no dark tones here because the ink will hold its shape yet still remain soft.
Next, I took off the masking cloth and ink the seedling, trunk, moss, and flowers. Softening any harsh transitions is the last step, so between the foreground and background, I applied a bit of color onto the edges of the seedling as well as the surrounding growth.
Establishing the Values Created by Heavy Fog
I created the following misty trees in the fog tattoo design last month. I used a reference photo to produce the design and it was real challenging task indeed. The reference photo depicted a scene that was very foggy to the point that all of the values run together and there wasn’t any definition at all!
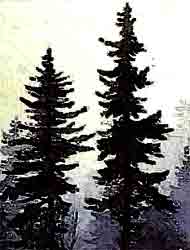
Fortunately the solution was that difficult to figure out. Even though the fog nearly obscures the trees located within the background, I defined their shapes using successive layers of very light inking. What I did was made the foreground more sharply focused than it actually appears.
Step One
You’ll be working with the ink-in-ink technique for much of the background. Go grab a really thick practice tattoo skin so you can follow this tutorial. Now, after I’ve made the sketch, my next step was to mask out the flowers and grass in the foreground. I wanted them done during the final stage of the design. If you have your practice skin ready, then start putting in a graded tattoo pigment. Check out my final design and you can see the graded ink is comprised of Davy's gray and yellow ocher. As you approach the foreground, intensify the ink tone using Payne's gray and ultramarine.
Step Two
After you have finished applying inks on the background, prepare for another series of inking application using colors like Davey's gray, cerulean blue, and yellow ocher. The aim this time is to depict the lightest trees in the background. Texture or detail must not be added at this point in time. Instead, you simply work on displaying their silhouettes. Once you’ve completed those silhouettes, proceed to add slightly darker trees. When the intermediate ones are done, add still darker trees. Each layer of tattoo ink should be just a tad darker than the previous one.
Step Three
Put in the tall trees in the foreground. To make these trees really dominate the composition, paint them in a slightly darker value than what you actually see. It's essential that you capture the grace and beauty of the branches silhouetted against the lighter trees and the sky without adding very much detail. To break up the masses formed by the branches, paint the trees using two closely related shades. Using a few simple strokes, suggest the scraggly undergrowth.
As a final step, remove the mask from the foreground area and lay in some ink of green. Once this has dried, render small branches with vertical strokes, making sure to leave the white of the paper to indicate flowers.
Reviewing the Finished Tattoo
Confident as well as quick needlework makes the finished tattoo art solid and unified. In the tall, dark trees in the foreground, it suggests the weight of the branches. Such effect can easily be achieved by working from the trunk upward. The needle becomes drier toward the periphery of the trees, therefore aiding in conveying the rough feel of the branches.
The spring flowers which are positioned in the immediate foreground establish the season and provide a splash of color. Rendered with the proper needle size, they continue the up-and-down sensation established by the tall trees throughout the tattoo.
